If you want to know How to Clean Dryer Vent Duct Properly at Home, the answer is simple: disconnect the dryer, remove and clean the vent hose, brush and vacuum the full duct system from inside and outside, then test airflow before reconnecting. Done correctly, this process removes lint buildup, restores airflow, reduces fire risk, and improves dryer efficiency.
Dryer vent cleaning is not just a maintenance task. It is a safety measure that prevents house fires, lowers energy bills, and extends appliance lifespan. When airflow is restricted by debris, the heating element works harder, drying time increases, and overheating becomes a real concern.
This guide walks you through every step with safety, performance, and long term maintenance in mind.
Why Cleaning Your Dryer Vent Duct Is So Important
Lint accumulation inside a dryer vent duct is highly flammable. When airflow restriction occurs, heat builds up in the duct system. Over time, this combination increases fire hazard risk significantly.
Blocked airflow also reduces dryer performance. Clothes take longer to dry, cycles run repeatedly, and energy efficiency drops. The appliance works harder, shortening its lifespan.
IMPORTANT: A clogged dryer vent does not just affect drying time. It affects safety, efficiency, and your monthly utility costs.
Signs Your Dryer Vent Duct Needs Cleaning
You do not need special tools to recognize airflow problems. The warning signs are usually visible and noticeable.
Common clogged dryer vent symptoms include:
- Clothes taking more than one cycle to dry
- A burning smell during operation
- Excess heat in the laundry room
- Exterior vent flap not opening fully
- Visible lint around the vent pipe
If you notice any of these issues, dryer vent cleaning should not be delayed.
Tools You Need to Clean Dryer Vent Duct at Home
Proper tools make the process safer and more effective. Most homeowners can complete DIY dryer vent cleaning with affordable equipment.
Here is a practical tool breakdown:
| Tool | Purpose |
|---|---|
| Dryer vent cleaning brush kit | Loosens deep lint buildup |
| Drill powered brush attachment | Cleans long duct systems |
| Vacuum with hose extension | Removes loose debris |
| Screwdriver | Disconnects vent hose |
| Protective gloves and mask | Safety and hygiene |
Using the correct dryer vent cleaning kit ensures you reach deep into the vent pipe and remove hidden debris.
Before You Start: Safety Precautions
Safety comes first. Before cleaning any dryer vent duct, unplug the dryer. If you have a gas dryer, turn off the gas supply valve.
Allow the heating element to cool completely. Never clean while the appliance is warm. Check the vent hose type before disconnecting. Plastic or foil ducts are unsafe and should be replaced with rigid metal ducting.
Proper safety preparation reduces the risk of injury and prevents damage to the appliance.
Step by Step Guide to Clean Dryer Vent Duct Properly at Home
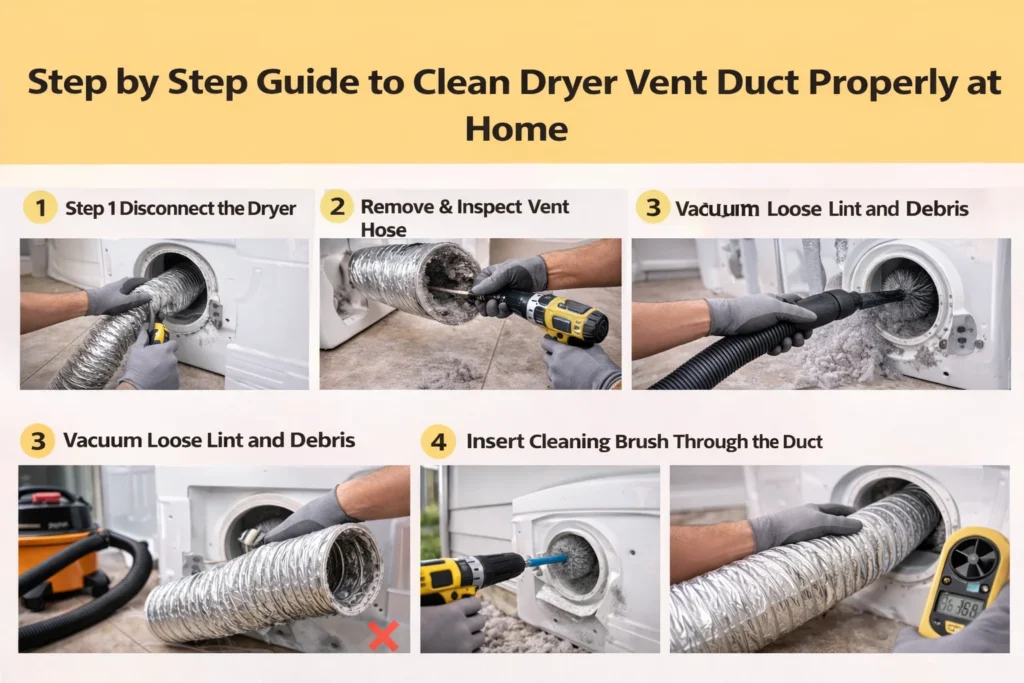
Below are the essential steps discussed to clean dryer vent duct properly at home in a safe and effective way. Follow each step carefully to remove lint buildup, restore airflow, and reduce potential fire risks.
Step 1 Disconnect the Dryer
Carefully pull the dryer away from the wall. Use a screwdriver to loosen the clamp holding the vent hose in place. Remove the flexible vent hose gently.
Inspect the hose for tears or crushing. Damaged hoses reduce airflow and increase overheating risk.
Step 2 Remove and Inspect the Vent Hose
Check inside the vent hose for lint buildup. Flexible foil hoses trap more lint than rigid metal ducts.
If the hose is plastic or thin foil, consider replacing it with a semi rigid aluminum or rigid metal duct for better airflow circulation and safety.
Step 3 Vacuum Loose Lint and Debris
Use a vacuum cleaner with a hose attachment to remove visible lint from the dryer outlet and duct opening.
Insert the vacuum hose as far into the duct system as possible. This removes loose debris before brushing deeper buildup.
Step 4 Insert Cleaning Brush Through the Duct
Attach the dryer vent cleaning brush to a drill if your duct is long. Insert it into the vent pipe slowly while rotating.
The brush loosens compacted lint and debris. Move in sections to ensure complete cleaning, especially if your vent length exceeds 25 feet.
Multiple 90 degree bends increase airflow restriction and may require extra passes.
Step 5 Clean From the Exterior Vent Opening
Go outside and locate the exterior vent cap. Remove the cover if possible.
Insert the brush or vacuum hose from the outside to remove debris trapped near the vent flap. Ensure the flap moves freely and is not blocked by bird nests or lint accumulation.
Exterior vent cleaning is often overlooked but essential for proper airflow.
Step 6 Reassemble and Test Airflow
Reconnect the vent hose securely. Push the dryer back into place without crushing the duct.
Run the dryer on an air only cycle. Go outside and check the exhaust vent. Strong airflow indicates successful cleaning.
If airflow remains weak, further duct inspection may be required.
Cleaning Vertical vs Horizontal Dryer Vent Systems
Most guides ignore vertical systems, but they require special attention. Roof vent systems accumulate lint differently due to gravity and airflow resistance.
Long vertical ducts often exceed 25 feet. Building codes typically recommend limiting vent length and minimizing bends to reduce blockage.
If your system includes multiple turns or extends through the roof, professional dryer vent cleaning may be safer.
How Often Should You Clean Dryer Vent Duct
Maintenance frequency depends on household usage.
- Large families should clean every 6 months
- Average households should clean once per year
- Pet owners should inspect more frequently
High lint-producing fabrics increase debris buildup faster.
Regular inspection prevents emergency situations and improves energy savings.
How Dryer Vent Cleaning Improves Energy Efficiency
A clean dryer vent reduces drying time significantly. When airflow moves freely, clothes dry faster and require fewer cycles.
Here is a simple comparison:
| Condition | Impact |
|---|---|
| Clean vent | Shorter drying time, lower energy use |
| Clogged vent | Longer cycles, higher utility costs |
Energy efficiency improves because the heating element does not need to overcompensate for restricted airflow.
Common Mistakes When Cleaning Dryer Vent Duct
Many DIY mistakes reduce cleaning effectiveness.
Common errors include:
- Only cleaning the lint trap
- Ignoring the exterior vent
- Using a leaf blower incorrectly
- Reinstalling damaged vent hoses
- Using plastic vent material
Each of these mistakes can leave hidden debris inside the duct system.
When to Call a Professional Dryer Vent Cleaning Service
DIY dryer vent cleaning works for most systems. However, certain conditions require expert help.
Call a professional if:
- Vent duct exceeds 25 feet
- Roof access is required
- Repeated clogging occurs
- Mold smell persists
- Bird nests or rodent intrusion are detected
Professional dryer vent cleaning cost varies but often ranges between moderate service fees depending on system complexity.
Dryer Vent Inspection Checklist
After cleaning, inspect your system carefully.
- Vent hose secure and not crushed
- Rigid metal duct installed
- Exterior vent flap opens freely
- No visible lint buildup
- Airflow strong and steady
This checklist ensures your dryer duct maintenance is complete.
Dryer Vent Material Types and Safety
Not all vent materials are equal. Rigid metal ducts are the safest and most efficient.
Semi rigid aluminum is acceptable but less durable. Flexible foil or plastic vent hoses are unsafe and increase fire hazard risk.
Upgrading vent material improves airflow and long term safety.
Mold and Pest Issues Inside Dryer Vent Ducts
In humid climates, moisture buildup can combine with lint to create mold growth inside the duct system.
Exterior vent openings may also attract birds or rodents seeking warmth. Nesting materials block airflow and increase overheating risk.
Routine inspection prevents these hidden hazards.
Final Safety Test After Cleaning
Once reassembled, monitor the dryer for the first full cycle.
Check for unusual vibration, overheating, or weak exhaust airflow. Confirm that drying time improves.
If clothes still require extended cycles, further airflow testing may be needed.
Key Takeaways
Cleaning your dryer vent duct properly at home is one of the most important household maintenance tasks.
Regular cleaning prevents lint accumulation, improves dryer efficiency, reduces drying time, and lowers fire hazard risk.
Using proper tools, maintaining correct vent materials, and inspecting both interior and exterior openings ensures complete airflow restoration.
Frequently Asked Questions
Find answers to the most common questions
Can I clean dryer vent without moving the dryer?
No. Accessing the vent hose connection requires pulling the dryer away from the wall to clean the full duct system safely.
How long does dryer vent cleaning take?
For most standard systems, cleaning takes between 30 minutes and one hour depending on vent length.
Is dryer vent cleaning dangerous?
It is safe when proper precautions are followed, including disconnecting power and avoiding sharp duct edges.
Can a clogged vent cause carbon monoxide issues?
In gas dryers, blocked vents may cause improper exhaust ventilation, increasing risk. Proper airflow is essential.
Does cleaning dryer vent reduce electricity bill?
Yes. Improved airflow reduces drying time and energy consumption, lowering overall utility costs.
Conclusion
Knowing How to Clean Dryer Vent Duct Properly at Home empowers you to protect your home and improve appliance performance. The process requires careful steps, proper tools, and consistent maintenance.
When done correctly, dryer vent cleaning reduces energy use, prevents overheating, and extends the lifespan of your appliance. Regular inspection every 6 to 12 months keeps your system safe and efficient.
A clean dryer vent is not just about faster drying. It is about safety, savings, and long term reliability.