You bought an electric toothbrush. Good move. Studies consistently show they remove more plaque and reduce gum inflammation better than manual brushing. But here is what most people do not realise: the best electric toothbrushing technique is completely different from how you use a manual brush. If you are still scrubbing back and forth, you are using yours wrong, and potentially doing more harm than good.
This guide covers everything you need to know to get the most out of your electric toothbrush, from angle and pressure to timing, common mistakes, and tips for different brush types. All recommendations align with guidance from the American Dental Association (ADA) and leading dental professionals.
Why Electric Toothbrush Technique Matters
Electric toothbrushes do the cleaning work for you through their motorised bristle action. An oscillating-rotating brush like Oral-B delivers up to 48,000 movements per minute. A sonic brush like Philips Sonicare delivers over 62,000 brush movements per minute. That is far more action than any human wrist can produce.
But all that power is wasted, and can actually damage your teeth and gums, if you hold the brush in the wrong position, press too hard, or rush through the process. The electric toothbrush does the cleaning. Your job is to guide it slowly, gently, and systematically to every surface it needs to reach.
A Cochrane review, one of the most respected sources of independent health evidence, found that oscillating-rotating electric toothbrushes reduced plaque by 21% more and gingivitis by 11% more than manual brushing. Those results depend entirely on correct technique. A poorly used electric brush can still leave plaque behind at the gumline, the exact place where gum disease starts.
Before You Start: Setting Up Correctly
Use a Pea-Sized Amount of Toothpaste
The ADA recommends a pea-sized amount of fluoride toothpaste for anyone over the age of six. Do not load the full brush head. Too much toothpaste creates excess foam that can make you spit and rinse early, washing away the fluoride before it has had time to strengthen your enamel. A small amount is all you need.
Put the Brush in Your Mouth Before Switching It On
This sounds obvious but it matters. Turning on your electric toothbrush before it is in your mouth sends toothpaste flying. Always place the brush head against your teeth and gums first, then activate it. This also prevents splashing water and paste around your sink and mirror.
Choose a Soft Bristle Brush Head
Both the ADA and virtually every dental professional recommend soft bristles, not medium or hard. Soft bristles clean just as effectively as firmer ones but are far gentler on enamel and gum tissue. Medium and hard bristle heads increase the risk of enamel abrasion and gum recession, especially when combined with too much pressure, which most people apply.
The Best Electric Toothbrushing Technique: Step by Step
Step 1: Hold the Brush Like a Pen, Not a Scrubbing Tool
Hold your electric toothbrush with a light fingertip grip, similar to how you hold a pen. This naturally limits the amount of pressure you apply. If you are gripping it with your whole fist, you are almost certainly pressing too hard. A relaxed, light hold gives you more control and protects your gums.
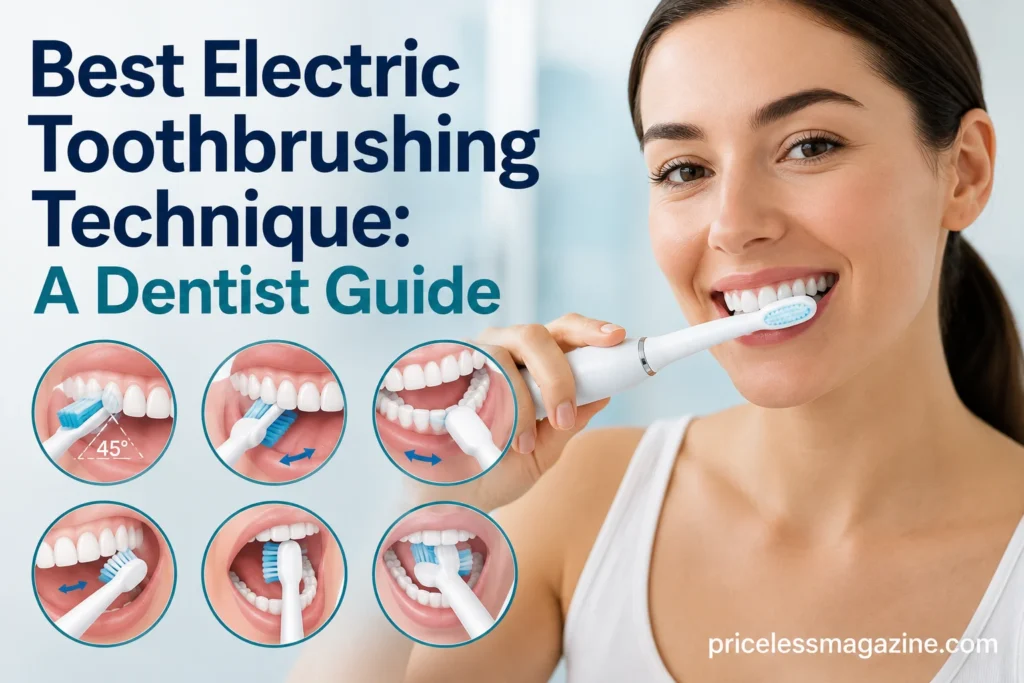
Step 2: Angle the Brush at 45 Degrees to the Gumline
This is the single most important positioning detail. The ADA specifies placing the brush head at a 45-degree angle to the gumline so that half the bristles contact the gum tissue and half contact the tooth surface. For upper teeth, the bristles should point upward toward the gums. For lower teeth, they should point downward.
This angle allows the bristle tips to gently slip just below the gumline into the sulcus, the tiny space between tooth and gum where plaque accumulates first. This is the zone where gum disease begins, and it is the zone most people miss completely by holding their brush flat against the middle of the tooth.
Step 3: Let the Brush Do the Work — Do Not Scrub
This is where most electric toothbrush users go wrong. They use the electric brush exactly like a manual one, scrubbing back and forth vigorously. This defeats the entire purpose. The oscillating, rotating, or sonic action of the brush head is already providing far more cleaning motion than your hand movement adds.
Instead of scrubbing, simply guide the brush slowly from tooth to tooth. Let it sit on each tooth for a few seconds before moving to the next. For oscillating brushes like Oral-B models, hold the brush still on each tooth and let the head do its circular work. For sonic brushes like Sonicare, use a slow gliding movement along the gumline, spending about 10 to 15 seconds on each group of two or three teeth.
Step 4: Use Minimal Pressure
Pressing harder does not clean better. This is one of the most persistent myths in oral hygiene. Hard pressure actually pushes the bristle tips flat against the tooth surface, preventing them from getting into the gumline and between teeth where they are most needed. It also causes enamel abrasion and gum recession over time.
The goal is a touch so light the bristles are barely flexing. Many modern electric toothbrushes, including models from Oral-B and Sonicare, have a built-in pressure sensor that either slows the brush down or flashes a light when you press too hard. If your toothbrush has this feature, pay attention to it. Most people are surprised to discover they have been over-pressing for years.
Step 5: Work Around the Mouth in Four Quadrants
Divide your mouth into four sections: upper right, upper left, lower right, and lower left. Spend 30 seconds on each quadrant for a total of two minutes of brushing. Many electric toothbrushes have a built-in timer that beeps or pulses every 30 seconds to signal when to move to the next section. Use it. Research shows most people who brush without a timer stop after 45 to 60 seconds, less than half the recommended time.
Within each quadrant, clean three surfaces of every tooth:
- Outer surface: The side facing your cheek and lips
- Inner surface: The side facing your tongue and the roof of your mouth
- Chewing surface: The top or biting surface of each tooth
Step 6: Clean the Inner Front Teeth Vertically
The inner surfaces of the lower front teeth are the most commonly missed area in brushing. The anatomy of the mouth makes horizontal brushing difficult here. The ADA recommends tilting the brush head vertically and using up-and-down strokes to clean the inner surface of front teeth, both upper and lower. This is one of the few times you use a directional movement rather than simply holding the brush in place.
Step 7: Brush Your Tongue
After finishing your teeth, turn the brush off and use the bristles to gently clean your tongue from back to front. The tongue harbours a significant amount of bacteria that contribute to bad breath and can redeposit on teeth and gums. Most people skip this entirely. A few gentle strokes make a noticeable difference in breath freshness throughout the day.
Step 8: Spit, Do Not Rinse
After brushing, spit out the excess toothpaste but do not rinse your mouth with water. Rinsing washes away the fluoride residue that continues to strengthen enamel after brushing. Dental health guidelines from organisations including Public Health England and many dental schools recommend spitting and leaving the fluoride in contact with your teeth rather than rinsing it away immediately.
Oscillating Brush vs Sonic Brush: Does Technique Differ?
Yes, slightly. Both types are highly effective, but they work differently and the ideal hand movement differs between them.
Oscillating-Rotating Brushes (Oral-B)
Oral-B’s round oscillating heads spin and rotate in alternating directions. With these brushes, the best technique is to hold the brush still on each tooth for a few seconds before moving to the next. Cup the round head around one tooth at a time and let the rotation do the cleaning. Then slide it to the next tooth. Think of it as a tooth-by-tooth process rather than a sweeping motion across several teeth at once.
Sonic Brushes (Philips Sonicare)
Sonicare brushes use high-frequency vibration to disrupt plaque, and they also generate fluid dynamics, meaning the movement of fluid between bristles can clean slightly beyond where the bristles physically touch. With these brushes, Philips recommends their “Slide and Glide” technique: slowly glide the brush head along the gumline, spending around 10 to 15 seconds on every two or three teeth. A slow, even glide works better than holding completely still because the sonic action benefits from covering the gumline in a continuous motion.
With both types, the key principles remain the same: 45-degree angle, light pressure, systematic coverage, two full minutes.
The Most Common Electric Toothbrushing Mistakes
Knowing what to avoid is just as important as knowing what to do. These are the mistakes dentists see most often.
Brushing Flat Against the Tooth
Most people hold the brush perpendicular to the tooth surface, flat against the middle of the tooth. This cleans the broad face of the tooth but completely misses the gumline, which is exactly where plaque accumulates first. Always angle at 45 degrees toward the gum.
Pressing Too Hard
Excessive pressure is one of the leading causes of gum recession and tooth sensitivity. Once your gums recede, they do not grow back. Use the lightest effective touch and let the motor do the work. If your gums bleed when you brush, pressing too hard is one of the most common causes, alongside infrequent brushing that allows plaque to build up and irritate the gums.
Scrubbing Back and Forth
This is the manual brushing habit that transfers directly, and incorrectly, to electric toothbrush use. Scrubbing reduces the effectiveness of the motorised action, misses the gumline, and increases abrasion risk. Guide slowly. Do not scrub.
Not Brushing Long Enough
The ADA recommendation is two minutes, twice a day. Most people brush for under a minute without a timer. Two minutes feels surprisingly long the first time you commit to it. Use your brush’s built-in timer or a separate app. The difference in plaque removal between 60 seconds and 120 seconds is substantial.
Using a Worn-Out Brush Head
Brush heads should be replaced every three months, or sooner if the bristles look frayed, flattened, or spread outward. Worn bristles cannot reach into the gumline the way they are designed to. Many brush heads now include colour indicator bristles that fade over time to signal when replacement is due. Do not wait until they look obviously worn. Three months is the maximum, not the target.
Skipping the Inner Tooth Surfaces
The inner surfaces of teeth, especially lower front teeth, are consistently the most neglected area. Plaque on the inner surfaces of lower front teeth is a direct contributor to tartar build-up and the calculus that only a dental hygienist can remove. Be deliberate about cleaning every inner surface during your brushing routine.
Electric Toothbrush Technique for Specific Needs
Sensitive Teeth and Gums
Use the sensitive mode if your brush has one. Apply even lighter pressure than usual. Choose a brush head specifically labelled for sensitive use, which will have softer, more densely packed bristles. If brushing causes pain or consistent bleeding, speak to your dentist. This can signal an underlying issue that needs professional attention, not just a technique adjustment.
Braces and Orthodontic Work
Electric toothbrushes are safe and effective with braces. Use an orthodontic brush head designed to clean around brackets and wires. Angle the brush to clean above and below each bracket separately, and be thorough around the wire. An interdental brush or water flosser alongside your electric toothbrush significantly improves cleaning results when you have fixed orthodontic appliances.
Implants, Crowns, and Veneers
Electric toothbrushes are safe for use around dental implants, crowns, and porcelain veneers. Use light pressure and the same 45-degree gumline technique. The gum margin around implants is particularly important to keep clean to prevent peri-implantitis, which is gum disease around an implant. Ask your dentist if a specific brush head is recommended for your implant type.
Children
Children can use electric toothbrushes designed for their age group. Children’s models have smaller brush heads, softer bristles, and shorter timer settings. Supervise brushing until age seven or eight to ensure correct technique is being developed. Children’s brushes with pressure sensors and app connectivity can make the process more engaging and teach good habits early.
Completing Your Routine: What to Do After Brushing
Electric toothbrushing is the cornerstone of your oral hygiene routine, but it does not do everything. Toothbrush bristles, no matter how good the brush, cannot clean the spaces between teeth. Those spaces require additional tools used once a day:
- Floss: Traditional string floss, floss picks, or floss threaders clean between teeth where no brush can reach. The ADA recommends flossing once per day.
- Interdental brushes: Small bottle-brush-style tools that are particularly effective for people with larger gaps between teeth, braces, or bridgework.
- Water flossers: Devices like Waterpik use a pressurised water stream to flush plaque and debris from between teeth and along the gumline. Particularly useful for people with braces, implants, or limited dexterity.
- Mouthwash: An antibacterial fluoride mouthwash used after brushing can offer additional protection, but should not replace brushing or flossing.
Conclusion
The best electric toothbrushing technique is not complicated, but it is different from what most people are doing. The biggest shifts to make are holding the brush at a 45-degree angle to your gumline, using a light fingertip grip instead of pressing hard, guiding the brush slowly instead of scrubbing, and committing to a full two minutes every single time.
Your electric toothbrush is already doing most of the cleaning work for you. Your role is simply to put it in the right place, with the right angle, for the right amount of time. Get those details right and you will see the difference at your next dental check-up.
Start tonight. Apply the 45-degree angle, use a light touch, and time yourself for two full minutes. It takes one week of conscious effort to make it a habit that protects your teeth for life.